 To ensure the proper fan performance as catalogued, caution must be exercised in fan placement and connection to the ventilation system. Obstructions, transitions, poorly designed elbows, improperly selected dampers, etc., can cause reduced performance, excessive noise, and increased mechanical stressing. For the fan to perform as published, the system must provide uniform and stable airflow into the fan.
The proper way of installing a fan is something very basic but quite often overlooked.
We know that a fan performance curve is a graphical representation of the operating capability of a fan, usually at a defined operating rotational speed. Also, this very same fan, if operated at a higher rotational speed, would have a higher output volume, higher pressure generated, and more power consumed. (This can be predicted from the FAN LAWS.)
Fans in our industry are tested and certified by AMCA – Air Movement and Control Association International – see www.amca.org. They are set up for testing with the best possible inlet and outlet conditions. As the fan is tested with the best airflow inlet and outlet conditions, the fan should also be installed on the job with equally good airflow conditions.
Surprisingly, a large number of contractors seem to fail to make this connection, or worse, simply ignore it. There are others still who say, “Yeah, but you don’t ever get ideal lab conditions in the field.” There is a logic fault in this kind of thinking. For a successful fan installation, a good, smooth flow of air in and out of the fan is essential if the fan is to deliver the desired performance.
Providing enough room for the fan and its connecting ductwork can be a problem if the designer has not allowed sufficient space. Unfortunately, lack of space for ductwork is a common oversight. If the problem were electrical it would be relatively easy to just reroute the wiring. When we try to move and re-align ducts, the situation is very different; every elbow, offset, and additional duct length creates resistance to airflow, resulting in an increased load on the fan system.
While it is true that installation space is very often a problem, it hardly seems sensible that the solution to a space problem is to simply cram the fan and its connections into whatever space is available. Every effort should be made to provide the fan/ductwork with the airflow conditions needed to do the job. The first step in providing good airflow for the fan is at the equipment selection stage of the design process, which means providing enough space in the mechanical rooms for the equipment that is to be installed. Cramming or shoe-horning fans and ductwork into too small a space is false economy when one considers the operational problems and associated costs that result; a poor installation is an inefficient installation for the owner.
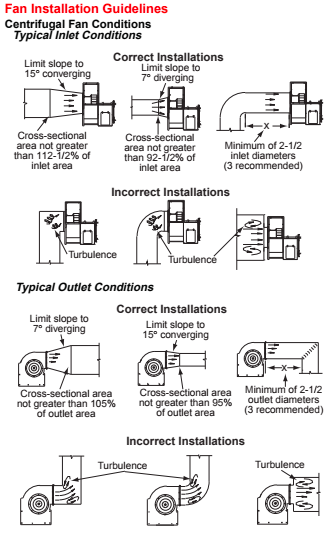
The price of an inefficient installation, even if it is able to function marginally, is a higher operating cost and operational problems with the fan equipment for the life of the installation. Figure 1 shows correct and incorrect fan installation guidelines for centrifugal fan conditions.
Let us assume that we are faced with a situation in which a fan is crammed into too small a space. What are we to do? Well, we are not powerless; there are several ways to cope with the problem. They are listed here in their order of effectiveness.
1. Make the necessary room. This is not always easy, but is best for all concerned.
2. Re-configure the inlet/outlet ductwork. If physically possible, rearrange ductwork to improve fan performance.
3. Provide guidance to the airflow inside the ductwork. This can be done using strategically placed turning vanes, splitters, and other such devices.
4. Rearrange the fan. This is most costly, but long-term, improved operating and maintenance costs may justify this solution.
The best solution is to allow for sufficient space in the design/ layout stage to have the fan and related ductwork perform at their best.